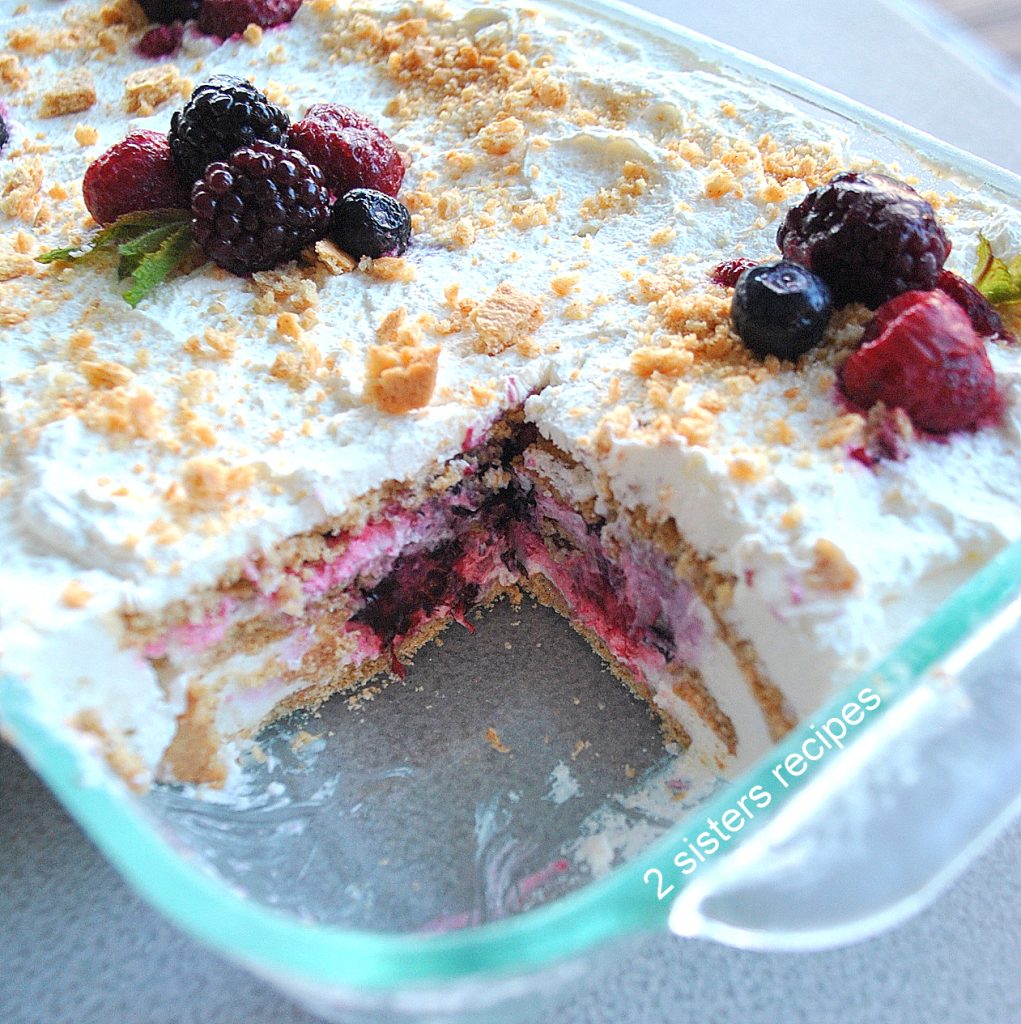
Mixed Berry Icebox Cake


This is a no-bake Mixed Berry Icebox Cake that features three delightful layers of mixed berries, whipped cream, and graham crackers. A delicious summer treat that’s fun to make, chill or freeze, then serve!
Reasons we love Mixed Berry Icebox Cake…
- It’s a practically effortless dessert to make!
- Requires no baking and no cooking!
- A hassle-free dessert that can be whipped up in just a few minutes.
- Plus, it only needs 7 ingredients to make it.
- An ideal treat for those who prefer a simple treat, without a lot of effort.
- It is sweet, creamy, and loaded with berries – it’s perfect!
What is an Icebox Cake?
The icebox cake was first introduced in the 1920’s. It was basically a way to create a simple dessert with a few ingredients. And, it was primarily a “no-bake” dessert, made with layers of whipped cream and pre-packed cookies or ladyfingers, then chilled in the refrigerator for the few hours, and sliced like a cake.
Tell Us About This Mixed Berry Icebox Cake
The Cream: This icebox cake is made with fresh whipped cream. We prefer “fresh” whipped cream rather than artificial stuff for our icebox cake.
The Cookies: We made this simple cake using graham crackers as the cookies. It gave this cake a nice crunch and delicious flavor.
The Berries: Also, we used frozen berries simply because we had them in our freezer, making this icebox cake come together in minutes.
Quick Recipe Tips
- Keep in mind, we made this icebox cake using frozen mixed berries. But you can use a mixture of fresh berries if you like.
- Measure the amount of Frozen Berries needed for this recipe. No need to thaw. Then toss them with some sugar and lemon juice. Set them aside.
- Also, this icebox can be either chilled in the refrigerator or put into the freezer to chill it quicker. But it will need to be chilled for a few hours in order for the graham crackers to softened.
- If you plan to serve it the day you make the cake, then you can make it ahead a few hours, and keep it chilled (uncovered) in your refrigerator.
- If you plan to make this icebox cake one or two days ahead, we recommend you freeze it.
- Get creative! With our recipe, you can easily make your own favorite flavor of icebox cakes, using different cookies, jams or jelly’s and fresh fruit.
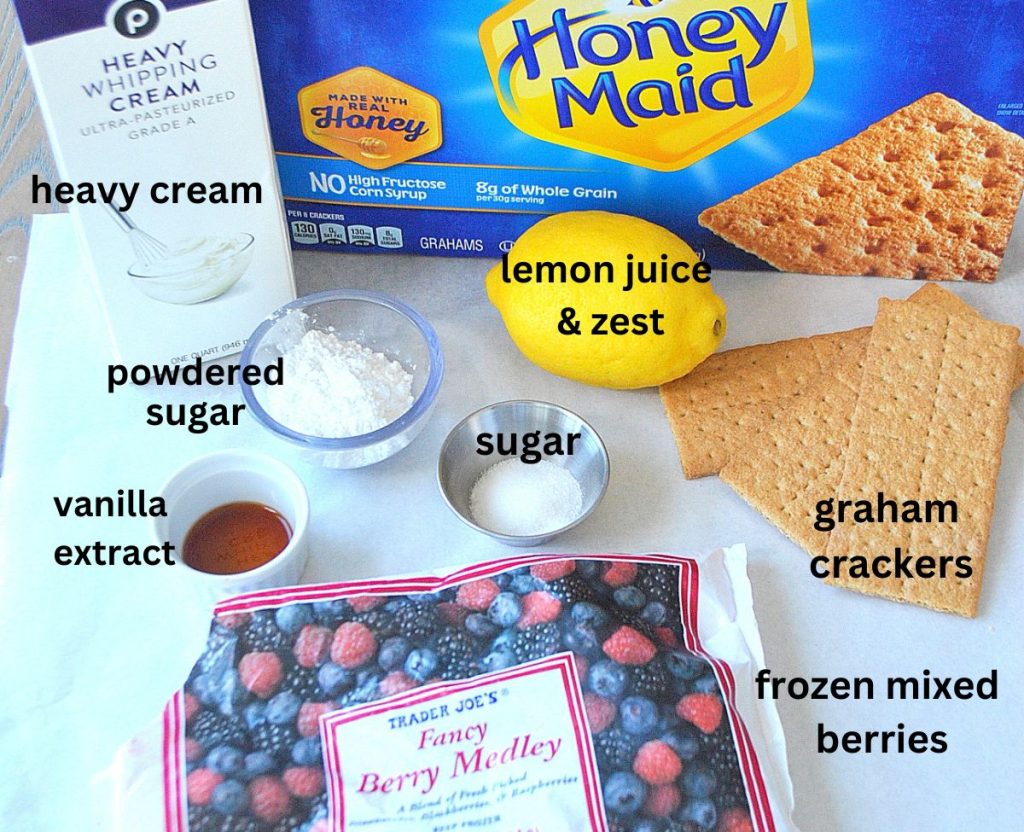
Overview: Ingredients You Will Need
For our mixed berry icebox cake, you will need the following ingredients:
- Frozen Mixed Berries – choose any package of frozen mixed berries, it makes this cake easier. And best of all? No need to thaw the berries beforehand.
- Lemon Juice – we prefer freshly squeezed lemon juice because it gives a fresh flavor to this cake.
- Sugar – a small amount of granulated sugar is used to sweeten the berries.
- Heavy Cream – is needed to make fresh whipped cream.
- Powdered Sugar – is needed to thicken the whipped cream.
- Lemon Zest – to give a light lemon undertone flavor to the whipped cream.
- Vanilla Extract – is also needed to flavor the whipped cream.
- Graham Crackers – creates the cookie layers, and offers a little crunch to this delicious icebox cake.
- Fresh Mint – is optional as a garnish. A few mint leaves give this icebox cake a festive look.
How To Make Mixed Berry Icebox Cake? (Step-by-Step)
This Mixed Berry Icebox Cake comes together in just 3 Easy Steps. Our full printable recipe card is located at the bottom. But first, let’s run through our easy-to-follow steps, so you’ll understand what’s involved before you start.
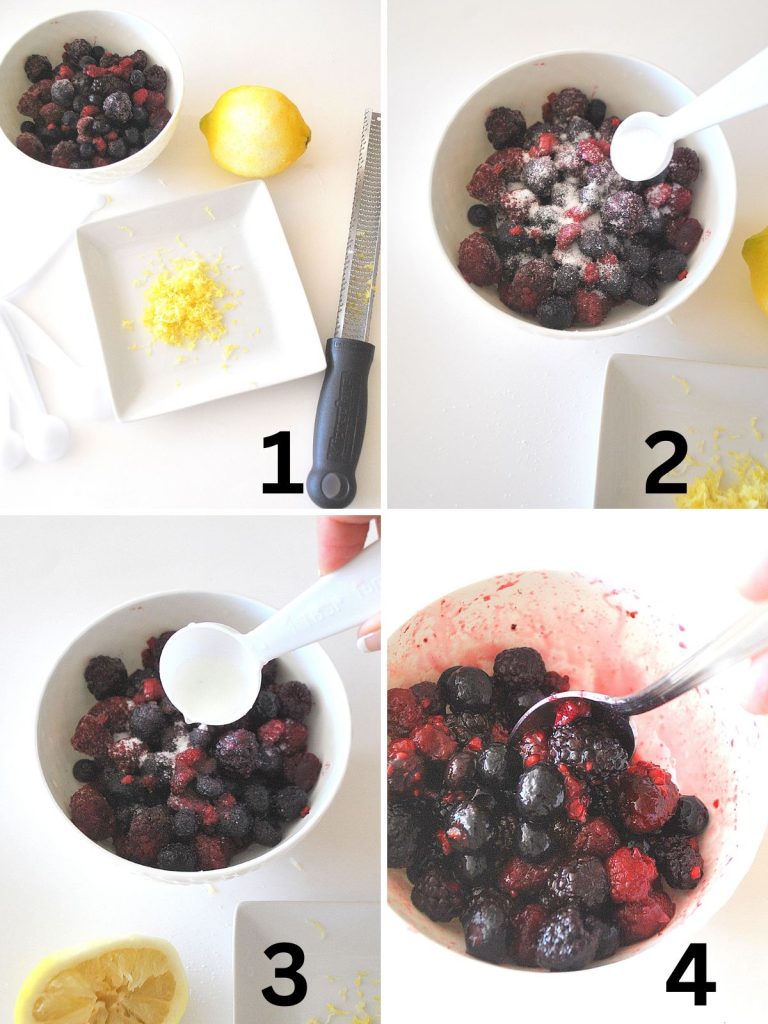
A.) Prep and Prepare the Frozen Berries:
- First, zest 1/2 of a lemon! You will need 1 heaping tablespoon of lemon zest for the whipped cream, then set it aside. Next, measure 2.5 cups of frozen berries and place them into a bowl.
- Sprinkle over the berries with 2 teaspoons of granulated sugar.
- Then measure 2 tablespoons of lemon juice, and pour that over the frozen berries.
- Stir the berries a few times to combine the juice and sugar. Set it aside.
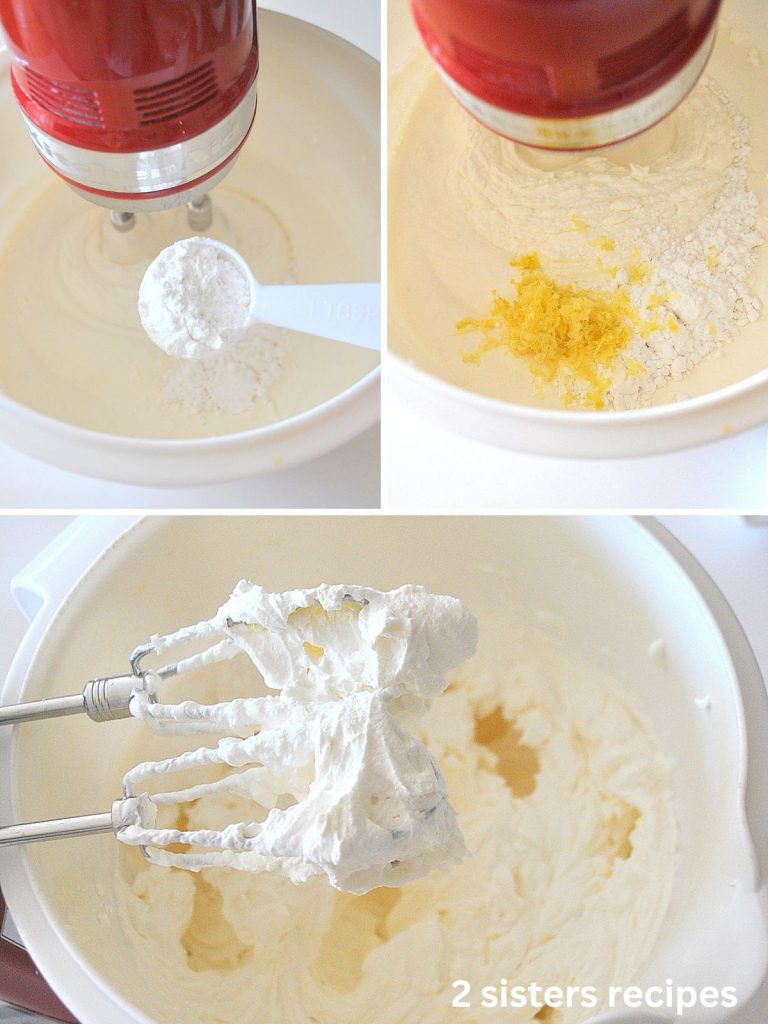
B.) Make the Whipped Cream:
- In a large mixing bowl, pour 2.5 cups of heavy whipping cream. Beat for 2 minutes.
- Then, scrape down the sides and beat in the powdered sugar and vanilla extract.
- Next, beat in the lemon zest, and continue to beat for at least 5 minutes, until it forms stiff peaks.
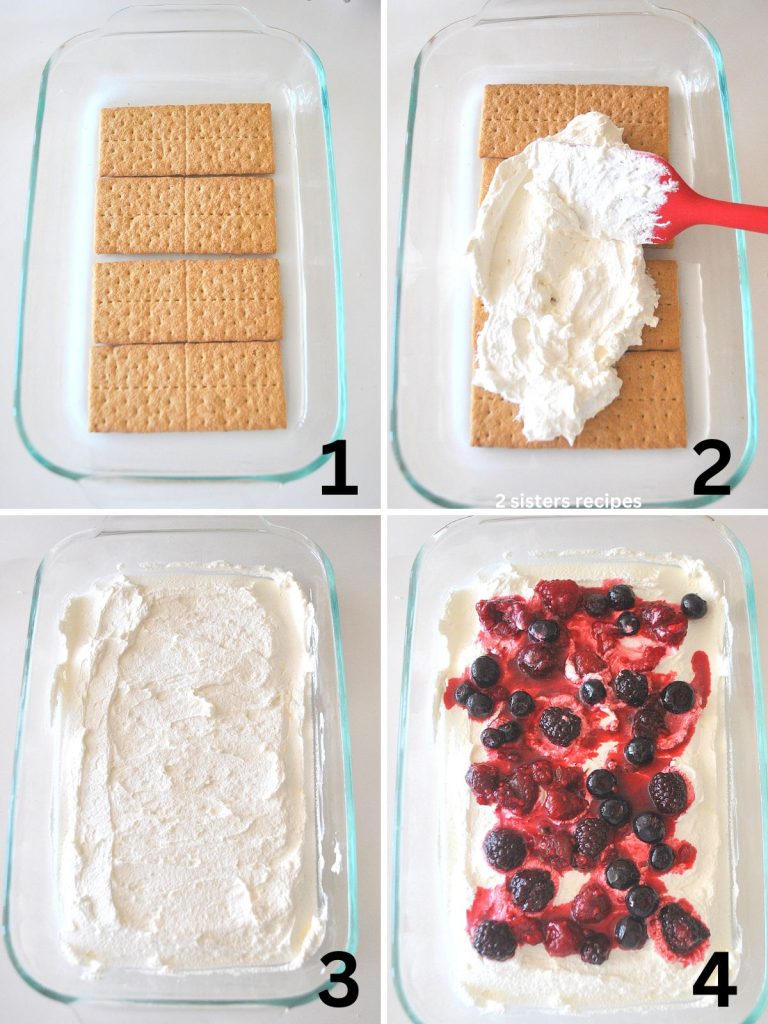
C.) Assemble The Icebox Cake:
- FIRST: Lay the first layer of crackers on the bottom of the baking dish.
- NEXT: Gently spread about 1/3 of the whipped cream over the crackers. NOTE: Here is where you may need to hold down the crackers as you spread the whipped cream.
- 1st LAYER: Slowly spread the whipped cream evenly to create the first layer.
- SPREAD BERRIES: Use a spoon, take half of the mixed berries mixture, and scatter them over the whipped cream.
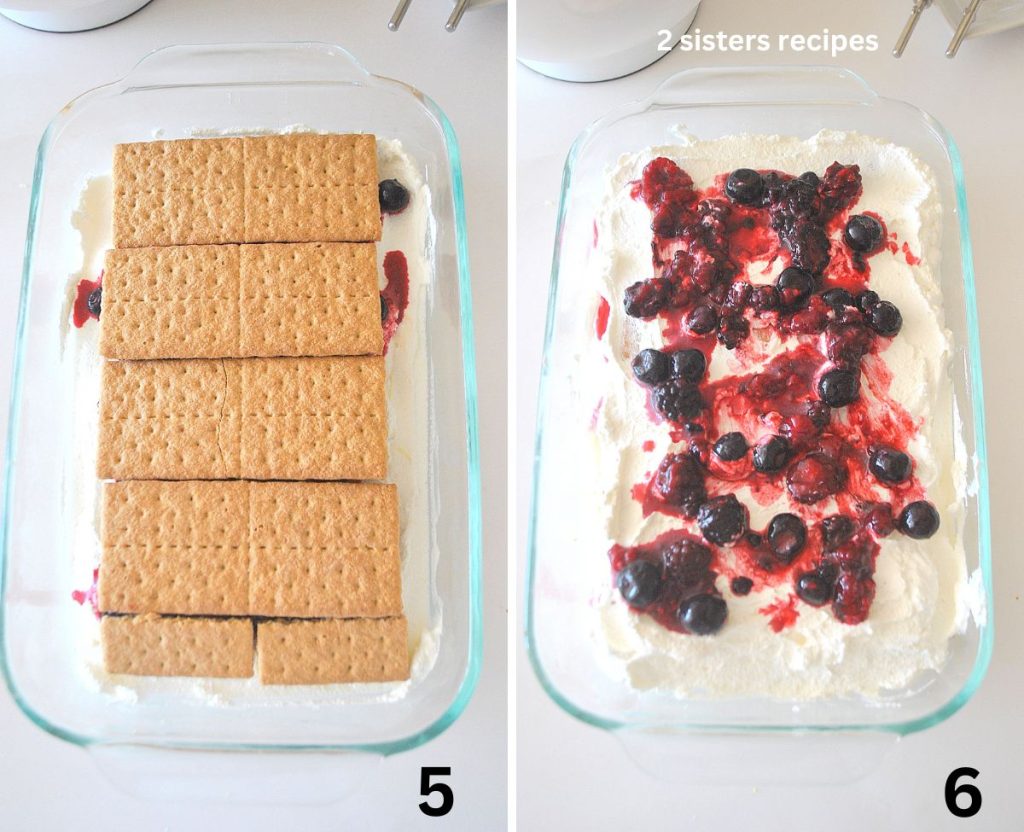
5. THEN, REPEAT IT! Top with the second layer of graham crackers. You can break a few to make them fit (just like a lasagna).
6. SECOND LAYER: Add a second layer of whipped cream (leave the last 1/3 for the final layer and topping). Scatter with the remaining mixed berries, including all its juices.
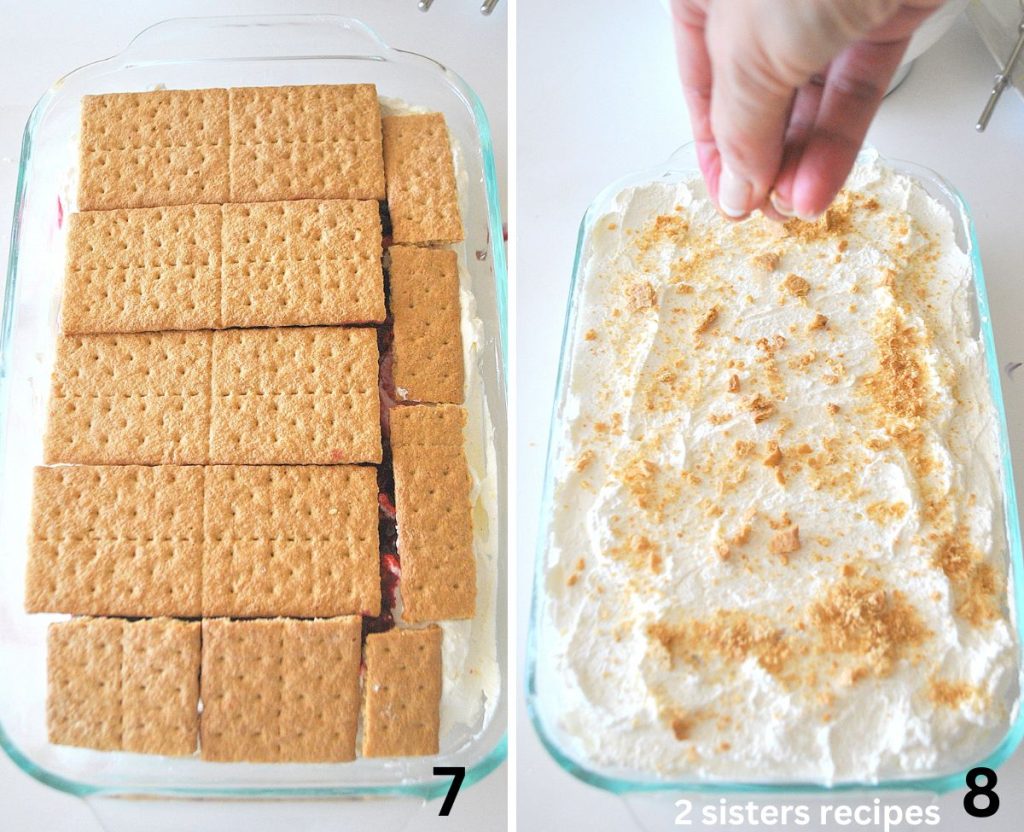
7. Cover again with the final layer of graham crackers, and break some crackers to make them fit to cover the surface.
8. Top with the remaining whipped cream. Spread it evenly. Then sprinkle on top with some graham crackers crumbs.
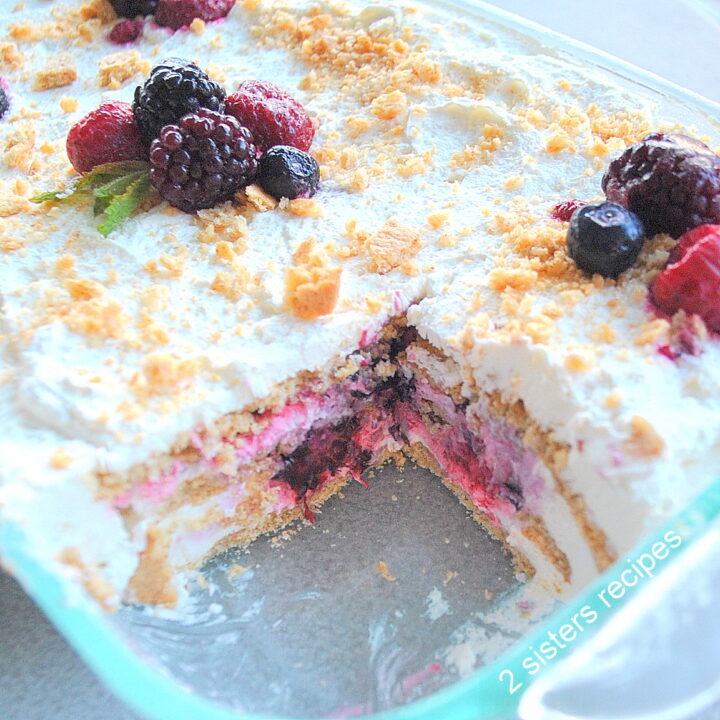
D.) Decorate the Top:
Top the cake with a few frozen mixed berries on top. You can hold the fresh mint leaves as garnish when you’re ready to serve.
E.) Freeze the Cake:
Next, place it into your refrigerator or freezer until it is firm enough to cover with clear wrap. If you are making this icebox cake ahead, we recommend to freezing it. Therefore, cover and freeze for at least 4 to 6 hours.

When Ready to Serve…
Remove the icebox cake from your fridge or the freezer. Remove the plastic wrap. If frozen, allow it to thaw on your counter for 10 to 20 minutes. Garnish with fresh mint leaves and cut into square pieces and serve.
It’s so lusciously creamy and delicious! Everyone will LOVE this icebox cake. Try it! 🙂
ENJOY!!
More ‘No-Bake’ Desserts
- Easy Ice Cream Cake
- Easy Strawberry and Banana Kabobs with Chocolate
- Best Tiramisu
- No Bake Banana Icebox Bars
- 5 Minute Mixed Berry Pie
Your comments help us! Tried our Mixed Berry Icebox Cake? Let us know and leave a comment below, and don’t forget the stars! And, we thank you from the bottom of our hearts! 🙂
Mixed Berry Icebox Cake
This easy Mixed Berry Icebox Cake features luscious layers of mixed berries, whipped cream, and graham crackers. It's a refreshing frozen treat and a delightful dessert all in one. What's more, it doesn't require any baking or cooking! An easy dessert to make all summer long!
Ingredients
- 2 + 1/2 cups of frozen mixed berries
- 2 Tbsp. fresh lemon juice
- 2 tsp. granulated sugar
FOR ICEBOX CAKE:
- 2 + 1/2 cups heavy cream
- 1 Tbsp. lemon zest
- 1 tsp. vanilla extract
- 15 graham crackers squares
- extra frozen berries, to decorate the top
- some fresh mint leaves, as garnish
Instructions
1. First, measure 2 and a half cups of frozen mixed berries and place them into a bowl. Add the sugar and lemon juice and stir them a few times to allow the sugar and lemon juice to coat the berries. Then set it aside while you make the whipped cream.
2. In another bowl, beat heavy cream on high speed for about 2 minutes, until it thickens. Scrape the bowl and add the lemon zest and vanilla extract. Continue to beat at the highest speed until the cream forms stiff peaks, and is thick and smooth, about 5 minutes.
3. Next, place an 8"x 8" pan or a 7" x 11" (2.2Qt /2L) Pyrex dish on your counter. Open the graham crackers and sort out the ones that are not broken. Place the first layer of crackers (about 3 or 4) on the bottom of the dish. Spread 1/3 of the cream over the crackers.
4. Spoon half of the berries mixture over the whipped cream. Then gently press 4 additional rectangular graham crackers evenly into the berries and cream. Repeat with adding another layer of whipped cream over the crackers, and spread it evenly. Then spoon the remaining mixed berries over the cream.
5. Place the final and 3rd layers of crackers on the cream. You can break them to make them fit and cover the surface.
6. Spread on top with the remaining whipped cream. Sprinkle on top with graham cracker crumbs, and decorate the icebox cake with some frozen berries and fresh mint leaves on top, as garnish. Leave the cake on the counter for about 5 minutes, to allow the berries and cream to soften the crackers.
7. Freeze the icebox cake until is it hard, about 1 to 2 hours. Then cover it with clear plastic wrap and continue to freeze for additional 4 to 6 hours.
TO SERVE ICEBOX CAKE:
Remove the icebox cake from the freezer, and remove the plastic wrap. Allow it to thaw on your counter for 10 to 15 minutes. Cut pieces into squares and serve.
Serves: 8 or 9
Nutrition Information:
Yield: 9 servings Serving Size: 1 servingAmount Per Serving: Calories: 150Total Fat: 12.7gCarbohydrates: 8.1gFiber: 1.5gSugar: 4.4gProtein: 1.1g
Happy and Healthy Life! 🙂
Thanks for stopping by…
xo anna and liz
Related Posts:

")


Welcome! From Anna and Liz
We believe the kitchen is the center and the heart of the home. It is where we cook, eat, and unwind with family and friends, creating memorable traditions! Read more…
FREE EMAIL BONUS
Weeknight Dinners Made Easy
Tips & recipes for delicious meals . . . no matter your skill level!
FREE EMAIL BONUS
Weeknight Dinners Made Easy
Tips & recipes for delicious meals . . . no matter your skill level!
I was reading about cool whip cos that’s not really a thing here in australia. we probably do have it tho. But apparently aussies prefer to whip their own! that cream you mention here is what we call chantilly cream, whereas whipped cream is just that – cream that is whipped 🙂
can’t wait to try this icebox cake recipe!
Thanks Sherry! This recipe is a keeper! Enjoy, and have a great weekend. 🙂