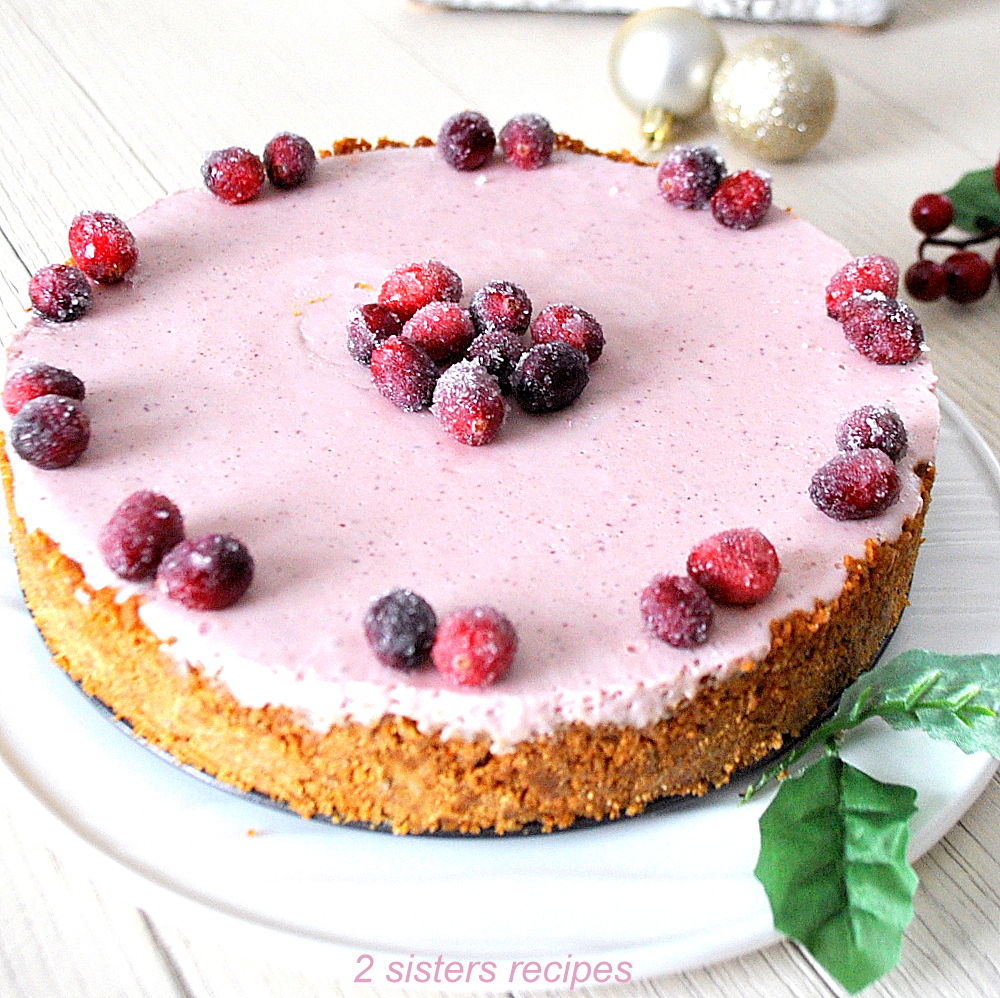
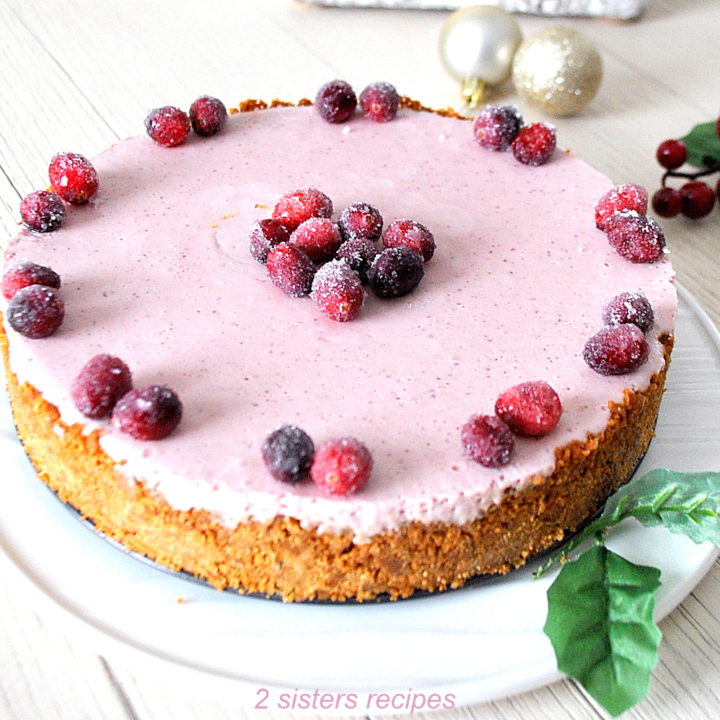
Holiday Cranberry Cheesecake (No-Bake!)


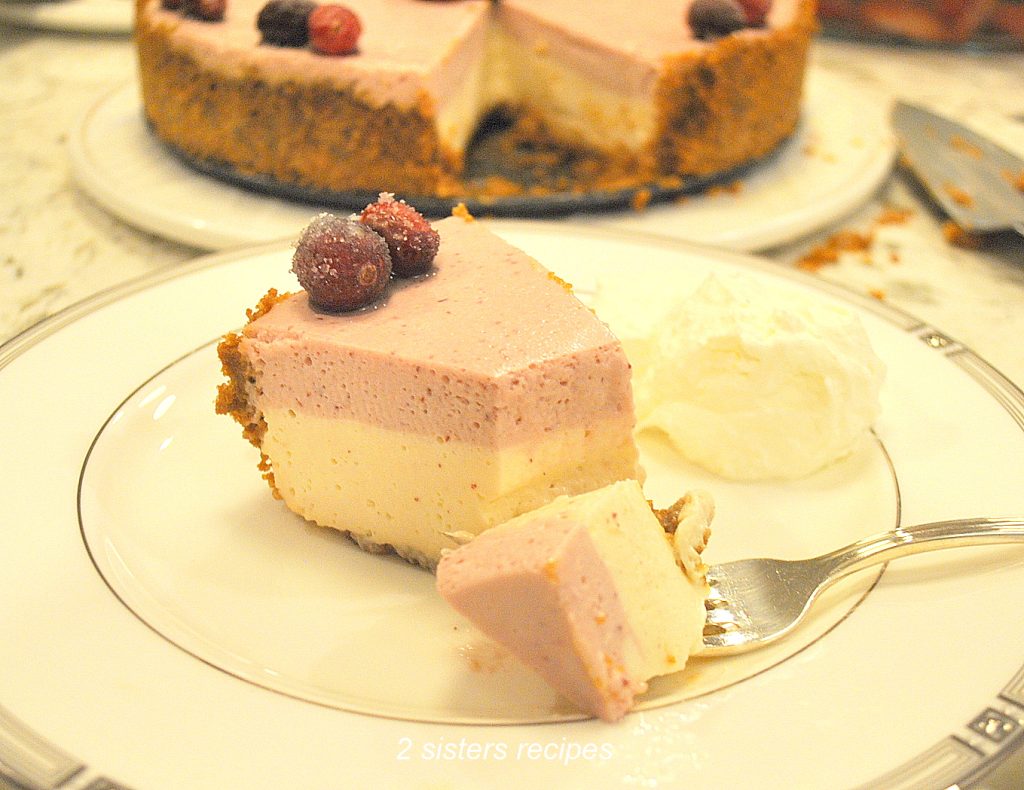
Indulge in the delightful flavors of our no-bake Holiday Cranberry Cheesecake. This cranberry cheesecake features two layers of vanilla and cranberry flavors, and is set on a cookie-crumb crust. It’s a no-bake dessert that’s simply easy to make and fabulous! We’ll show you our step-by-step photos on how to make this delicious dessert.
Reasons we LOVE this No-Bake Holiday Cranberry Cheesecake…
- This amazing dessert has a mousse-like texture that will thrill your guests!
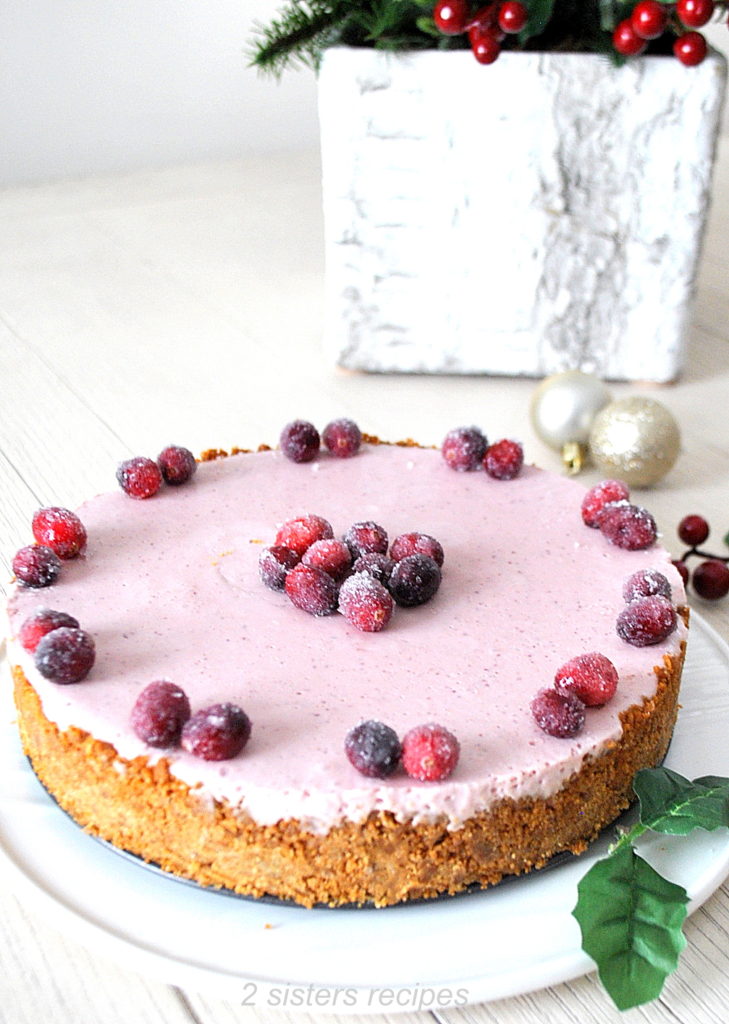
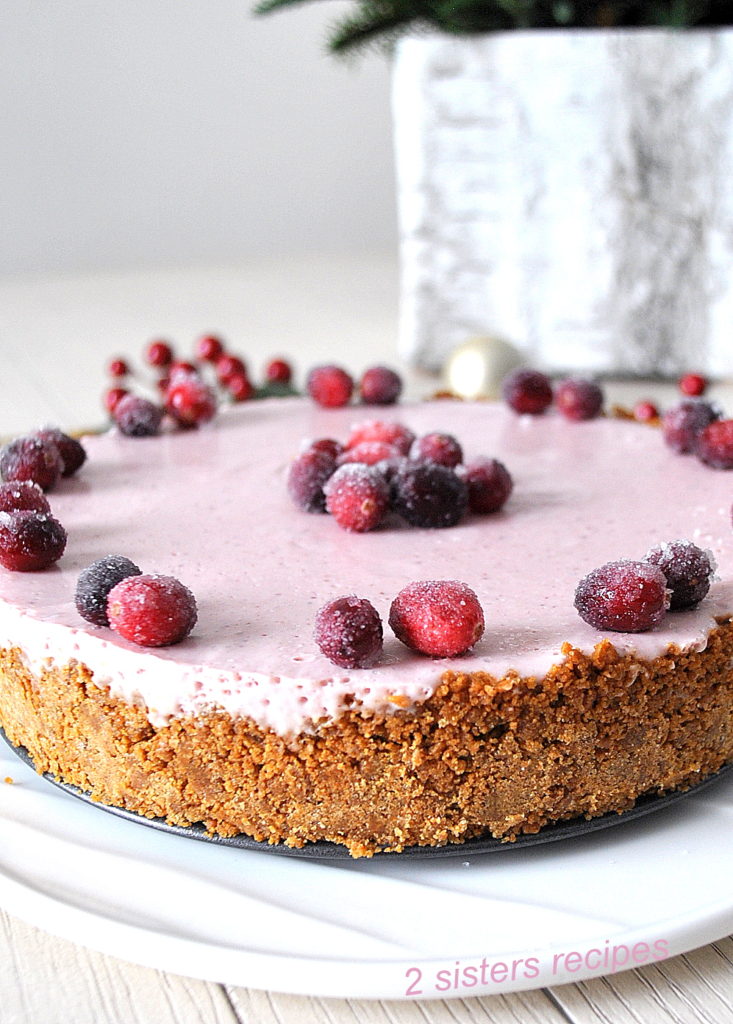
- It is topped with sugared cranberries as a garnish, completing this fabulous dessert, and will complement your festive dinner.
- It’s so darn easy!
- Plus, it is the perfect “make-ahead” dessert for the holidays and one you can make and chill for up to two days.
- Best of all, no baking is required… what-so-ever!
- It will be the “star” on your dessert table this holiday season. Guaranteed!
This recipe is adapted from my all-time favorite, Best No-Bake Pumpkin Cheesecake. If you haven’t tried it yet, you’ll have to try this one too!
Recipe Tips Before You Start:
- First, make some room in your freezer for your 7-inch or 8-inch springform pan to fit on a shelf somewhere.
- Before you begin, remove the cream cheese from the refrigerator, place it on the counter, and allow it to warm up for a few minutes. Slice the brick into 4 equal parts. It’s best to have the cream cheese at room temperature to blend easily with the other ingredients.
- Oh, and take out your blender, because you will use it to blend the filling for both layers.
Ingredients for our Holiday Cranberry Cheesecake Recipe:
For our no-bake Holiday Cranberry Cheesecake recipe, you will need the following ingredients: (with a few affiliate links)
- gingersnap cookies – finely crushed (about 22 to 25 small cookies).
- brown sugar – you can use either light or dark brown sugar.
- butter – is needed for the crust, and is melted.
- heavy cream – is used in the filling for both layers.
- unflavored powdered gelatin – (I used Knox).
- granulated sugar – to sweeten the filling.
- cream cheese – only 1 package (8 ounces) is all you need and divided, and at room temperature.
- vanilla extract – to flavor the cheesecake layer.
- sour cream – always softens the texture of the cheesecake.
- ground nutmeg – to give a warm, cozy spice to the flavor.
- whole-berry cranberry sauce – 1 can of 14 ounces is all you will need.
- Optional: Fresh or frozen cranberries to decorate, as a garnish
How to Make No-Bake Holiday Cranberry Cheesecake? (Step-by-Step):
Before you begin, gather all the ingredients you will need for this recipe. Then the rest is very straightforward and easy to follow. Plus, our full recipe card is located at the bottom.
Step 1: Make the Crust…
1. Crush gingersnap cookies (or Gluten-Free gingersnap cookies), and blend them with sugar and butter, and press down on the bottom and up the sides of the springform pan.
2. Then transfer the pan into the freezer.
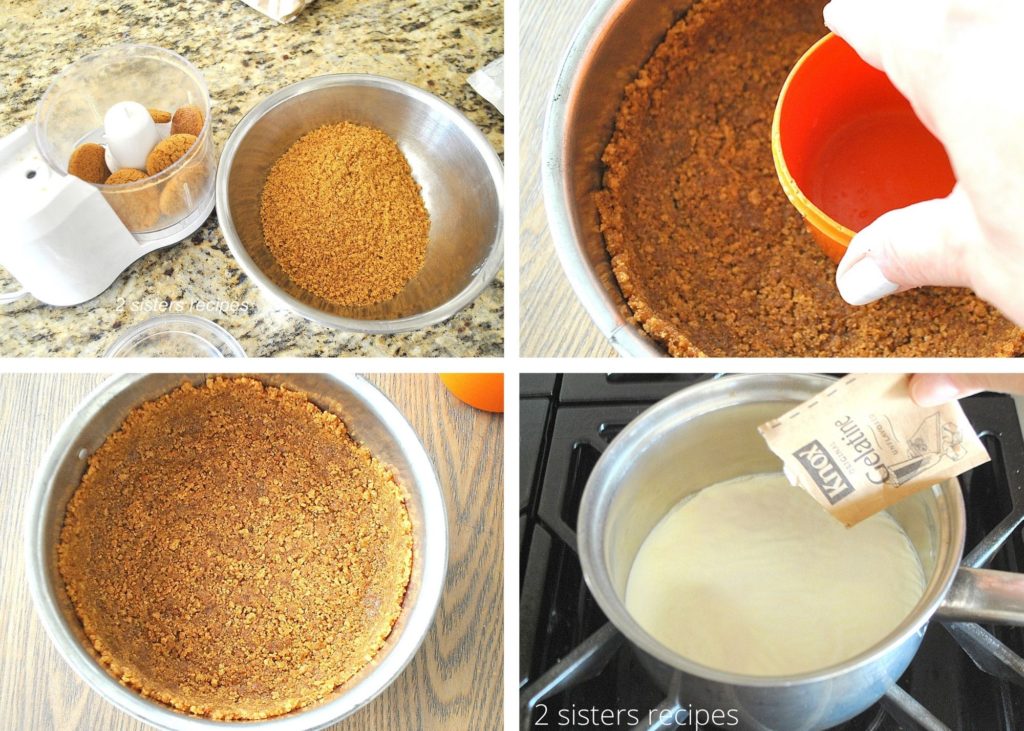
Step 2: Make The Filling…
1. In the meantime, in a small saucepan, pour in the heavy cream and sprinkle ONLY 1 + 1/2 teaspoons of the gelatin over the cream. Let it sit for about one minute.
2. Turn on low heat and stir the cream. Add in the sugar, and vanilla, and continue to stir until the sugar is completely dissolved. Turn off the heat.
3. Next, place 3/4 of the cream cheese (reserve the remaining 1/4 for the second layer), sour cream, and ground nutmeg into the blender. Turn the blender on the lowest speed, open the top slowly pour in the hot cream mixture, and continue to blend until well incorporated.
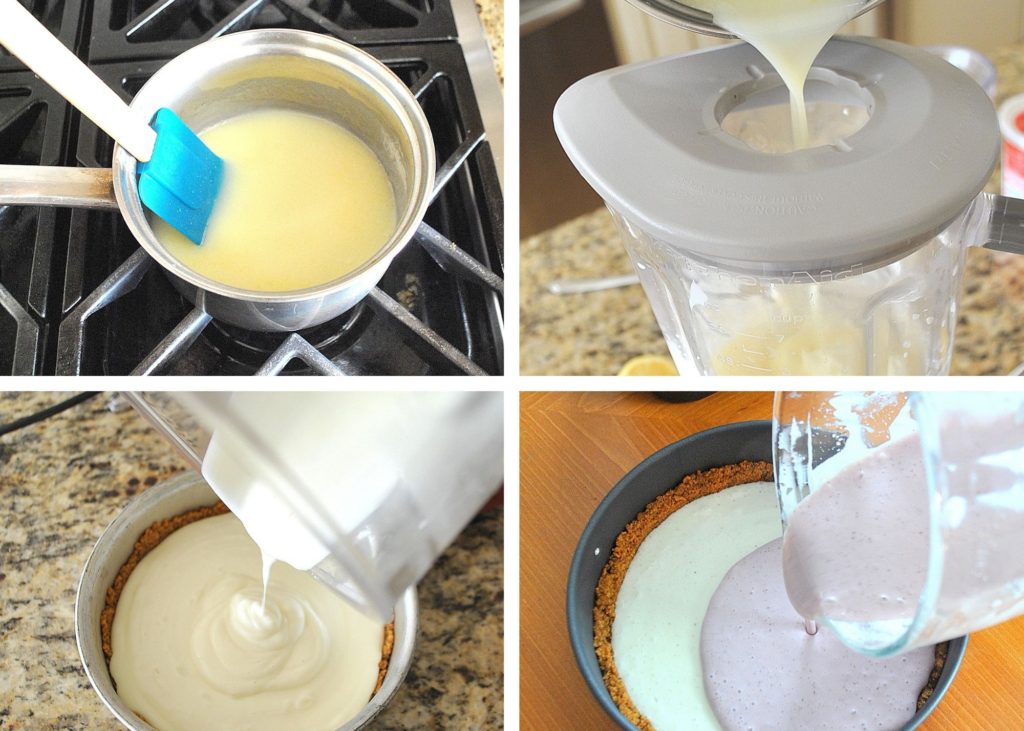
4. Remove the crust from the freezer and pour the 1st layer of cheesecake filling into the crust. Transfer back into the freezer once again.
Step 3: Make the Cranberry Flavor (2nd Layer)…
1. Repeat the same process for the second layer, the cranberry filling, only with slightly different ingredients. QUICK NOTE: No need to rinse the saucepan or the blender. Follow the remaining directions in our recipe card below.
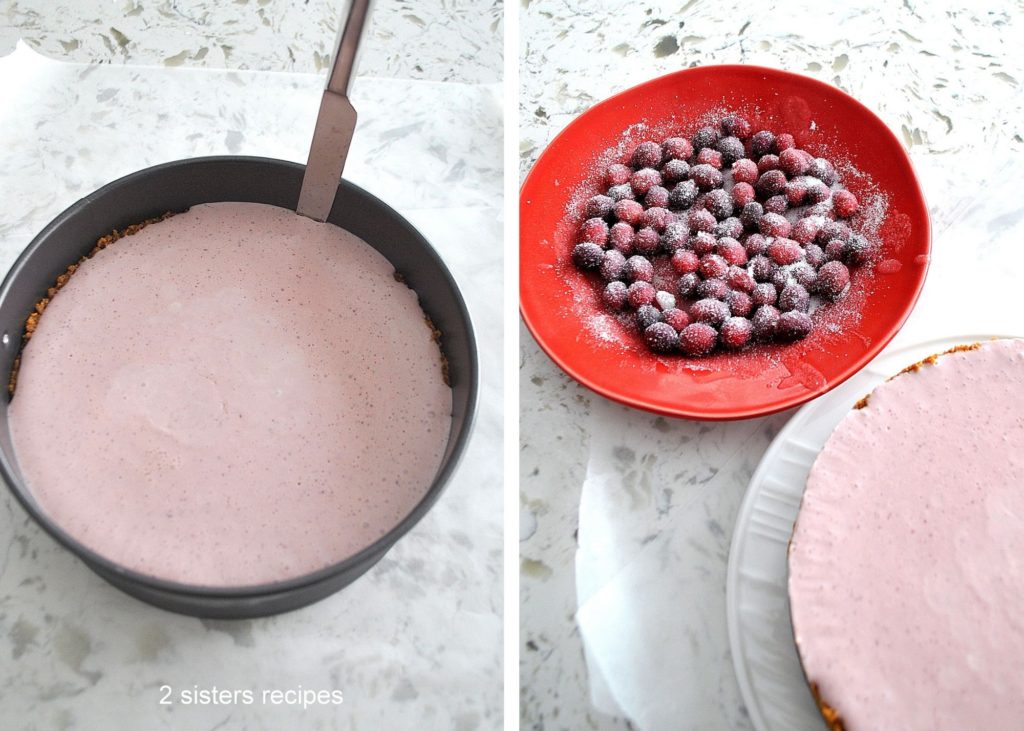
2. Transfer the cheesecake to your refrigerator (uncovered) and chill for a few hours, or overnight is best.
When Ready to Serve…
- Run a clean knife around the edge of the springform pan to loosen the cake from the sides. Do it twice, to be sure. Then pop open the clip and gently lift the pan.
- Garnish on top with either sugared cranberries (recipe included below), or with plain fresh cranberries, and do this only when you are ready to serve. Then transfer to a serving plate. It’s best served chilled.
- Serve with a dollop of whipped cream on the side. But it’s not necessary, this dessert is delicious all by itself. 😉
FAQ’s plus Tips
- How do we achieve the height? To achieve its beautiful height with this dessert, it’s best to use a smaller springform pan, as I have done here. (link to Amazon: 7-inch leakproof springform pan, or an 8-inch pan)
- How to firm the crust without baking? The quickest solution (and a great trick) to firm the crust is to place the crust into the freezer for at least 10 minutes before adding the filling. And it works every time.
- Can we make this cheesecake ahead? Yes, you can. Make it ahead one or two days and keep it chilled in the refrigerator.
- Can we freeze leftover cheesecake? Yes, you can freeze any leftovers. Be sure to wrap the cheesecake tightly with clear wrap and then again with aluminum foil. Then freeze. It will freeze for up to one month.
A Fabulous Dessert for the Holidays
Your family and friends will love this Holiday Cranberry Cheesecake. This is such a delicious dessert and a showstopper.
It will probably be the first dessert to disappear from your table. You’ll enjoy its double layers of flavors, over the gingersnap cookie crumbs crust on the bottom, which makes this dessert truly mouthwatering.
For me, a dessert that’s literally “no-fuss” to make, and can be made up to 2 days ahead – is a win-win in my book! … don’t you agree?!
Try my recipe, and send us a photo!
Enjoy!!
More Festive Recipes for Cheesecakes…
- Cranberry Cheesecake Bars
- Eggnog Cheesecake with Candied Pecans
- Best No-Bake Pumpkin Cheesecake
- Cranberry Buttercream Chocolate Cake
- Lemon Raspberry Panna Cotta Cheesecake
- Pear Maple-Pecan Cheesecake
Additional “No-Bake” Festive Desserts!
- Easy Peppermint Tiramisu
- Silky Chocolate Cream Pie
- The Best Tiramisu
- Chocolate Chip Cannoli Dip
- Classic Panna Cotta
- Chocolate-Dipped Apricots
Hello friends! If you make our delicious no-bake Holiday Cranberry Cheesecake, tell us and leave a comment and a star rating below! Have fun and snap a photo and share it on Instagram and Pinterest; be sure to hashtag # or tag us @2sistersrecipes.
No-Bake Holiday Cranberry Cheesecake
Indulge in the delightful flavors of our Cranberry Cheesecake. This easy and no-bake cheesecake showcases two delightful flavors, vanilla and cranberry, all set on a gingersnap cookie crumb crust. So fabulous, everyone will go bonkers!
Ingredients
For the CRUST
- 1 + 1/4 cups ( 251 grams) (GF or original) Ginger Snap Cookies- finely crushed (about 22 to 25 small cookies).
- 1/4 cup (50 grams) packed brown sugar (light or dark)
- 4 Tbsp. butter - melted
For the CHEESECAKE FILLING:
- 3/4 cup (180 grams) heavy cream
- 1 + 1/2 tsp. of unflavored gelatine powder (I used Knox)
- 1/2 cup (100.5 grams) of granulated sugar
- 1 (8-ounce) (226 grams) cream cheese - at room temperature (Divided, see my notes below)
- 1/2 tsp. vanilla extract
- 3/4 cup (180 grams) sour cream
- 1/4 tsp. ground nutmeg
For the CRANBERRY LAYER:
- 1/4 cup ( 60 grams) of heavy cream (or half & half)
- 1 + 1/2 tsp. of unflavored gelatine powder
- 1 Tbsp. granulated sugar
- 2-ounces (1/4 of the remaining brick) cream cheese
- 1/4 cup (50 grams) sour cream
- 3/4 cup (150.5 grams) of canned Whole Berry Cranberry Sauce
- Optional: Fresh or frozen cranberries to decorate, as a garnish
RECIPE FOR SUGARED CRANBERRIES:
- 1 + 1/2 cups of sugar
- 1 cup fresh cranberries
- 1 cup of water
Instructions
MAKE THE CRUST:
- First, crush the cookies. Please do this in two batches, put them into a mini chopper or food processor and pulse a few times until they are completely crushed.
- In a small bowl, use a fork to combine crushed cookie crumbs with melted butter and brown sugar.
- Pour the moist crumb mixture into a 7 or 8-inch springform cheesecake pan. Use a small glass or a measuring cup and press firmly on the bottom and up the sides. Then place the pan into your freezer for at least 10 minutes or more.
MAKE THE CHEESECAKE FILLING:
- First, pour the heavy cream into a small pot and place it on the stovetop. Sprinkle 1 + 1/2 teaspoons of the gelatine powder over the cream and leave it alone for a few seconds, then turn on low heat.
- Add the sugar and the vanilla extract, and stir until the sugar and gelatin have completely dissolved, and the cream is heated for about 2 to 3 minutes, or until it begins to bubble around the edges. Do not bring to a full boil. Turn off the heat.
- Next, take a knife and divide your block of cream cheese into 4 equal quarters. Add 3/4 of the cream cheese (reserve the remaining 1/4 of cream cheese for the 2nd layer), sour cream, and 1/4 teaspoon of ground nutmeg into the blender. And pour some of the hot cream mixtures into the blender. Cover with the lid and blend on low speed for about 30 seconds.
- Pop open the top of the lid on the blender and slowly pour in the remaining hot cream mixture. Close the top, grab a kitchen towel, and hold down the top of the blender as you blend and gradually increase its speed to the highest, and puree the mixture for about 1 to 2 minutes. Stop the blending and use a spatula to scrape down the sides of the blender to blend the mixture evenly. Blend again for an additional minute.
- Then remove the prepared crust from the freezer. Slowly pour the cream cheese mixture into the crust. Transfer the cheesecake pan back into the freezer while you make the cranberry layer.
MAKE THE CRANBERRY LAYER:
- In the same small pot (and no need to rinse), pour in the heavy cream (or half & half), and sprinkle over it with 1 + 1/2 teaspoons of unflavored gelatin powder and let it sit for about 30 seconds. Turn on low heat. Add in 1 tablespoon of sugar and stir until the gelatin and sugar are completely dissolved, and it's heated through. Turn off the heat.
- Using the same blender again (and no need to rinse it), add the remaining cream cheese, sour cream, and cranberry sauce and blend on low speed. Open the top of the cover and slowly pour in the hot gelatine mixture, and close the lid of the blender.
- Hold down the top and turn on the lowest speed for a few seconds. Then gradually increase your speed to the highest speed for about 2 to 3 minutes.
- Then turn off the blender, and use a spatula to scrape down the sides of the blender to blend the mixture evenly. And, blend again for an additional second more on low speed.
- Finally, pull out the cheesecake from the freezer.
- Slowly pour the cranberry mixture over the cheesecake layer and transfer it to your refrigerator and chill (uncovered) for at least 2 to 4 hours or more before serving. Overnight is best.
TO REMOVE THE CAKE PAN:
- Take a clean knife and slowly run it around the cheesecake to loosen it around the sides. Then pop open the clip and slowly lift the pan off the cake.
- Decorate with fresh or frozen cranberries on the top of the cheesecake, as a garnish. Place the entire dessert (do not remove the bottom of the pan) onto a large serving platter and slice into individual servings as needed.
DIRECTIONS TO MAKE SUGARED CRANBERRIES:
Notes
FAQ"s
- How do we achieve the height? To achieve its beautiful height with this dessert, it's best to use a smaller springform pan, as I have done here. (link to Amazon: 7-inch leakproof springform pan, or an 8-inch pan)
- How to firm the crust without baking? The quickest solution (and a great trick) to firm the crust is to place the crust into the freezer for at least 10 minutes before adding the filling. And it works every time.
- Can we make this cheesecake ahead? Yes, you can. Make it ahead one or two days and keep it chilled in the refrigerator.
- Can we freeze leftover cheesecake? Yes, you can freeze any leftovers. Be sure to wrap the cheesecake tightly with clear wrap and then again with aluminum foil. Then freeze. It will freeze for up to one month.
Nutrition Information:
Yield: 8 servings Serving Size: 1 servingAmount Per Serving: Calories: 359Total Fat: 28.2gCarbohydrates: 24.1gFiber: .7gSugar: 19gProtein: 3.6g
Happy and Healthy Holidays! 🙂
Thanks for stopping by!
xo anna and liz
Related Posts:


Welcome! From Anna and Liz
We believe the kitchen is the center and the heart of the home. It is where we cook, eat, and unwind with family and friends, creating memorable traditions! Read more…
FREE EMAIL BONUS
Weeknight Dinners Made Easy
Tips & recipes for delicious meals . . . no matter your skill level!
FREE EMAIL BONUS
Weeknight Dinners Made Easy
Tips & recipes for delicious meals . . . no matter your skill level!
I made this cheesecake for a friends dinner party and it was a 10/10. Everyone went crazy over it!! Another hit from your website. You’re the best, Anna!
Aw, thanks so much Jess! And welcome to our recipe blog, it’s so nice to meet you. Looking forward to hearing from you again. Thanks again. 🙂
What a beautiful cheesecake! It reminds me of the one on the cover of Bon Appetite last year but so much easier to make which is always a plus! Merry Christmas, Anna and Liz!!
Thank you so much, Susan! We must count our family blessings… we wish you many blessings this holiday season.
xo Merry Christmas!!
How fantastic! I’ve never had a cranberry cheesecake, but I can easily imagine how beautifully those flavors would go together. Excellent twist!
Thank you, Jeff! This is a great cheesecake and I hope you will get a chance to make it during this holiday season! ENJOY!!
I’m a sucker for cheesecake and this is a beauty! The perfect holiday dessert. Merry Christmas to you both!!! xo
Aw, thank you, Liz! Merry Christmas to you as well!
This looks and sounds wonderful! I love the layers and it looks so festive!
Happy Christmas, Anna and Liz!
Thank you, Sandra! This cheesecake is a definite winner. And a very Merry Christmas to you too! Enjoy!!